
Đã lâu không viết blog, nay mình trở lại với bài viết hướng dẫn cài đặt một LAMP Stack hoàn chỉnh cho 1 Amazon EC2 Instance. Mình đã quay clip lại quá trình khởi tạo Instance cũng như cài đặt các phần mềm cần thiết cho Web Server.
Một số phần mềm đã cài cho Web Server là: Apache, PHP, MySQL, FTP cũng như các cấu hình FTP, Apache hỗ trợ virtual host…
Clip:
Hy vọng các bạn nào chưa từng tiếp cận với Amazon Web Service có thể có cái nhìn gần hơn về cách triển khai Amazon EC2. Tham khảo thêm Amazon EC2 tại http://aws.amazon.com/ec2.
——-
Dưới đây là các ghi chú của mình trong quá trình cài đặt được hướng dẫn trong Clip.
——————-
SETUP LAMP ON AMAZON EC2 INSTANCE
——————————
STEP 1:
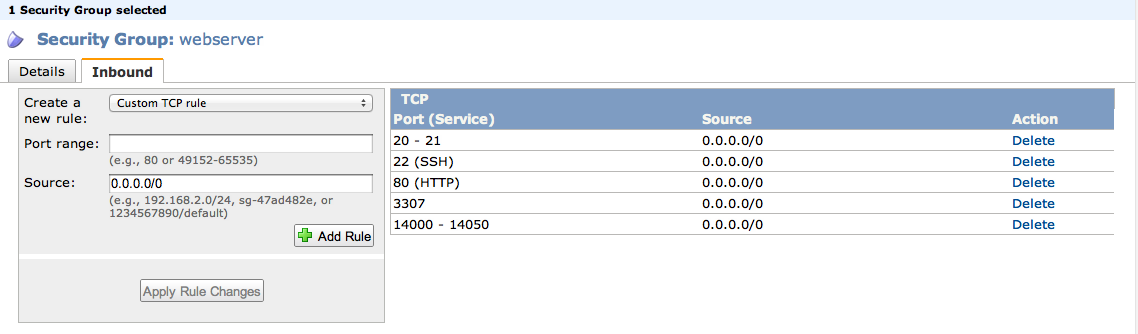
– Setup EC2 instance with Linux 64bit AMI (Create new Security Group with following photo)
– Save permission file (private key file) to secret location, remove “other” permission for this file (because of security) and keep carefully.
– Allocate Elastic IP Address and assign to EC2 Instance
– SSH To EC2 Instance
STEP 2:
– Install Apache + Edit Httpd.conf, vhost.conf
– Install PHP + Edit php.ini
– Install MySQL
– Install PhpMyAdmin
– Install Vsftpd + Edit vsftpd.conf
STEP 3:
– Take a drink.
===============================================
Note:
– Security Group setting:

#SSH to EC2 instance
ssh -i /path/to/private_key.pem [email protected]
#change permission of private key file (.pem) downloaded from amazon (600)
sudo chmod 600 /path/to/private_key.pem
#Update YUM for latest package:
sudo yum -y update
——————————–
#Install MySQL server
sudo yum install mysql-server mysql
# Start mysql server
sudo /etc/init.d/mysqld start
# Set root password for MySQL (Choose a strong one if the
# MySQL TCP port is going to be left open.)
mysqladmin -u root password
=====================
= for security, we need to create other mysql user for our web project
=====================
# create new mysql account
mysql -u root -p
#after login to mysql
#create database
CREATE DATABASE mydatabase;
#create new user, password and assign all priviledge for this new user for only one selected database
GRANT ALL ON mydatabase.* TO newusername@localhost IDENTIFIED BY ‘mypassword’;
#now, you can use new mysql account and new database for your project
—————
#install Apache
sudo yum install httpd
#And then start apache with command:
sudo service httpd start
———-
NOW, can connect with browser to http://youripaddress/ to check apache running
——–
#install PHP
sudo yum install php php-common libmcrypt libmcrypt-devel php-mcrypt php-mbstring php-pear php-gd php-pear php-devel php-xml php-mysql php-pdo
#After which we’ll want to restart Apache:
sudo service httpd restart
#create phpinfo() to check installed php
#create new file on web server
sudo vi /var/www/html/phpinfo.php
#Learn more about vi command here: http://www.lagmonster.org/docs/vi.html
#in vi editor, type anycharacter to turn on — INSERT — mode
#type the content for this file
<?php
phpinfo();
#press ESC to exit INSERT mode
#type :wq and [ENTER] to save this file and exit vi editor.
———-
NOW, can connect with browser to http://youripaddress/phpinfo.php to check php information.
——–
#enable htaccess (for Rewrite URL) of current working www
#by default, the web home directory can not use .htaccess for rewrite url even the mod_rewrite had been enable (by default also). (Check mod_rewrite enable or not at httpd.conf file, the line
LoadModule rewrite_module modules/mod_rewrite.so
#must not have the pound ‘#’ character at the beginning)
#If your www directory is at “/var/www/html”, you need to open the apache httpd.conf (maybe in /etc/httpd/conf/httpd.conf) and change:
<Directory “/var/www/html”>
…
AllowOverride None
….
</Directory>
to
<Directory “/var/www/html”>
…
AllowOverride All
….
</Directory>
#restart apache
sudo service httpd restart
==========
#Install phpmyadmin
#Check documentRoot (usally /var/www/html/)
# to check the document Root, run the command “grep documentRoot /etc/httpd/conf/httpd.conf”
#Download latest PhpMyadmin (this example is 3.3.9.1)
#untar downloaded .gz file
sudo tar -xzvf phpMyAdmin-3.3.9.1-all-languages.tar.gz -C /var/www/html
#move to webroot
cd /var/www/html
#rename phpmyadmin directory
sudo mv phpMyAdmin-3.3.9.1-all-languages phpmyadmin
#create config file
cd /var/www/html/phpmyadmin
sudo cp config.sample.inc.php config.inc.php
#edit config file
sudo vi config.inc.php
#set blowfish_secret variable.
$cfg[‘blowfish_secret’] = ‘yoursecretstring’;
#save and exit vi editor.
ESC,
:wq
[ENTER]
=====================
= FTP SERVER INSTALLATION
=====================
#install vsftpd
sudo yum install vsftpd
#disable anonymous FTP user by editing file “/etc/vsftpd/vsftpd.conf”
sudo vi /etc/vsftpd/vsftpd.conf
anonymous_enable=YES
-> anonymous_enable=NO
#uncomment this line (default)
local_enable=YES
#add more setting for passive mode on FTP client connection
pasv_enable=YES
pasv_min_port=14000
pasv_max_port=14050
port_enable=YES
#if you have assigned Elastic IP Address to your Instance
pasv_address=72.44.42.109
pasv_addr_resolve=NO
#or if you use default Public DNS of Instance
pasv_address=ec2-72-44-42-109.compute-1.amazonaws.com
pasv_addr_resolve=YES
#start(or restart) vsftpd
sudo service vsftpd start
#edit Security Group inbound of current instance security group
#add port range 20-21 and 14000-14050 to allow connection in FTP
#we need to create a FTP user login
sudo useradd -d /var/www/html -G apache ftpuser
sudo passwd ftpuser
sudo chown -R ftpuser /var/www/html
sudo chmod 775 /var/www/html
11 replies on “Cài đặt Web Server cho Amazon EC2 Instance [Video Clip]”
Bài viết rất chi tiết 🙂
Bài viết chi tiết. Và EC2 có phải là giải pháp cho doanh nghiệp vừa và nhỏ ko?
rất đầy đủ cảm ơn nhé .. thích nhất là cái Video dễ hiểu
Có video hướng dẫn cách tự deploy Amazon EC2 không ?
cảm ơn bài viết, mình thấy rất thú vị!
Hi anh Tuấn,
Em đã làm thử theo cách cài đặt của anh và thành công, cảm ơn anh nhiều lắm. Có 1 cái em ko làm đc là cái ftpuser, tạo rồi mà dùng phần mềm ftp để connect vào bằng tài khoản đó ftpuser nó cứ quay hoài, ko hiểu sao luôn.
Em kiểm tra thấy port 21 đã bật rồi, có ftpuser trong hệ thống luôn, anh có thể recommend em biết tại sao không? Cảm ơn anh Tuấn
[…] by Tuấn on how to setup PHP, MySQL, phpMyAdmin on EC2. Here are the detailed instructions http://bloghoctap.com/web-programming/cai-dat-web-server-cho-amazon-ec2-instance-video-clip.html and the video […]
Hi…
Can you please update this article for how install upgraded softwares means latest versions….
and I installed php 5.3, and apache 2.2 but I need to upgrade it… can you please help me in that..
Thank you
Thanks for the great tutorial!
One of the best and also shortes guides for setting a EC2 up. Thanks for that!
One command line has the wrong ” ‘ “, probably through autocorrect. one needs to use the regular ‘ for mypassword here:
GRANT ALL ON mydatabase.* TO newusername@localhost IDENTIFIED BY ‘mypassword’;
Chào bạn, mình có làm theo video hướng dẫn của bạn, mọi thứ đều ổn nhưng khi mình truy cập vào ip thì web không chạy, mình ping nhưng cũng không ping được. Rất mong bạn giúp.